
In part 1 we looked at the reasons for using Always Encrypted for xDB data and creating encryption keys in Azure Key Vault. In part 2 we looked at Column Master Keys and Column Encryption Keys in SQL Server. In this post I will cover the process of encrypting the data.
Before getting onto that topic I should point out that if you encrypt the data now, then your xDB collection, index worker, and search services will no longer be able to read xDB data until you create a Client ID and Client Secret that enable those services to retrieve the key from Azure Key Vault and use it to decrypt the column data in SQL. The documentation on how to do this is currently incorrect, and I will cover this in part 4. There are also some issues with the current documentation for encryption that are covered below.
Overview
The process of encryption entails a number of steps:
- Generate a script to recreate the stored procedures in your shard databases
- Delete stored procedures from the shards
- Disable change tracking on some of the tables in the shards
- Configure Always Encrypted on various columns in the shard database tables
- Restore the stored procedures
- Re-enable change tracking
- Grant permissions to the collection user
Encryption checklist
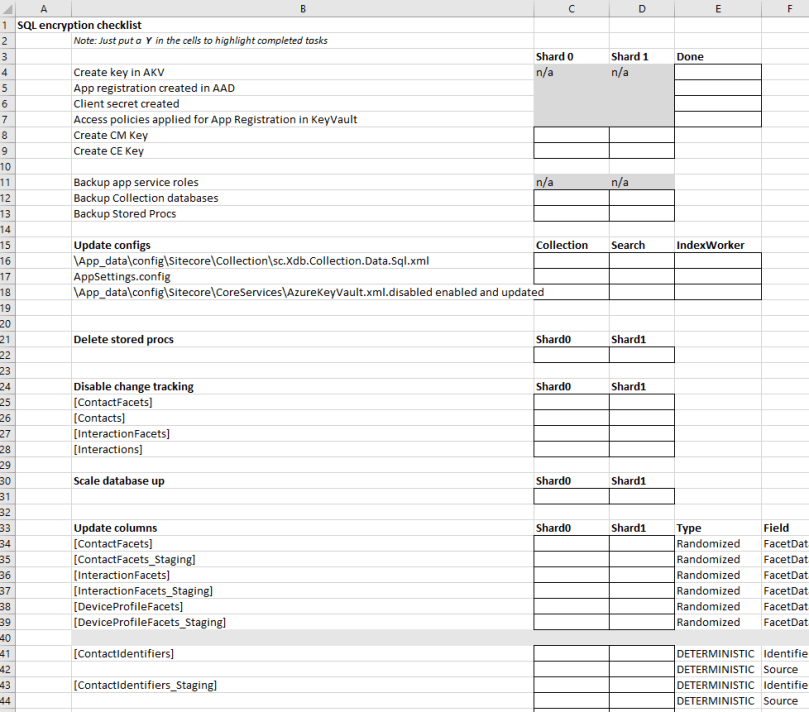
You will need to do every step listed above on each of your shard database. In order to help keep track of the steps and ensure that you don’t miss anything out, I’ve created a spreadsheet that you can download and mark off each step in the process.
Step 1 – Generate a script containing all stored procedures for each shard
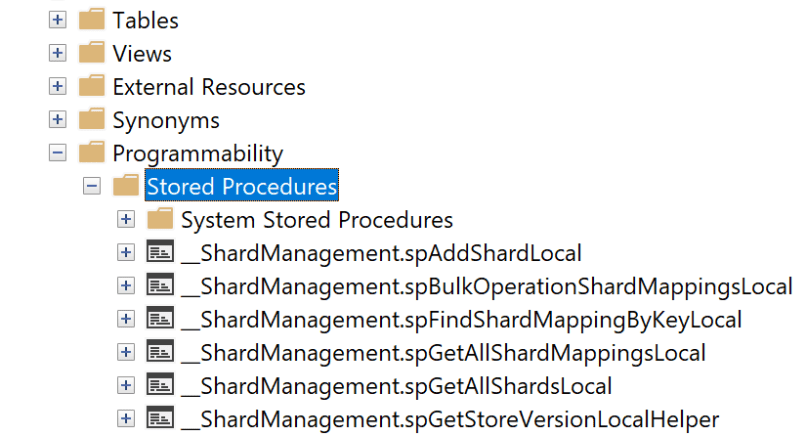
The stored procedures need to be backed up as a script, deleted, and then re-created after encryption. It was not obvious to me how to do this for all Stored Procs in one go, but it turns out there’s a handy trick. Navigate to the shard database Programmability > Stored Procedures area of the tree and click on Stored Procedures:
Hit function key F7 and the Object Explorer window will come up with all the stored procs listed. Select all of them (except for System Stored Procedures) and then right mouse click, select Script Stored Procedure as > CREATE to > New Query Editor Window (or to file, whatever you prefer):
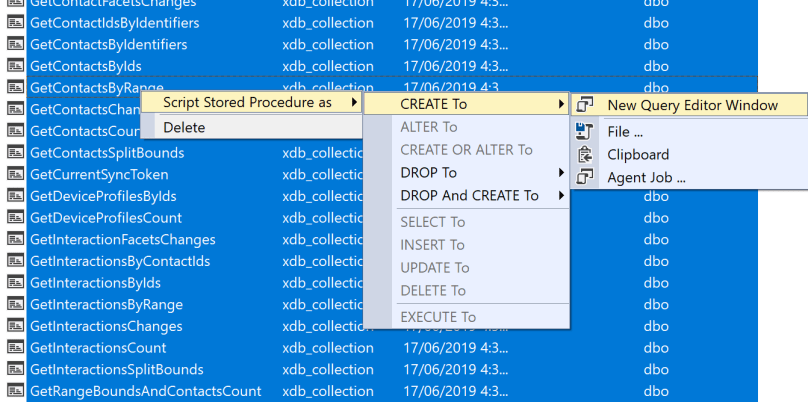
A script of all stored procedures will be generated that you can save for use in Step 5.
Step 2 – Delete stored procedures
Using the Object Explorer window as in Step 1, just select all the stored procedures (except for System Stored Procedures) and delete them.
Step 3 – Disable change tracking
Some of the tables need to have change tracking disabled (and re-enabled later on). For each table, right mouse click the table and open the Properties dialog, click Change Tracking from the left menu and turn it off. Alternatively you can use a script that I wrote.
Do this for the following tables:
- Contacts
- ContactFacets
- Interactions
- InteractionFacets
Step 4 – Configure Always Encrypted
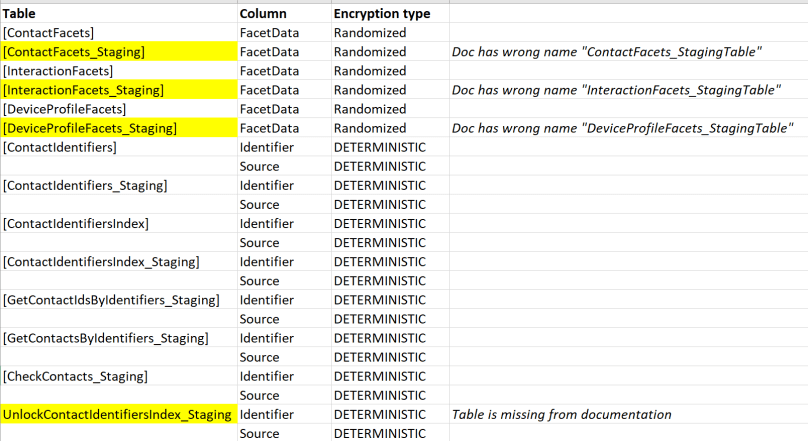
For each of the tables listed below, configure the appropriate encryption type on the appropriate columns. Before doing this, if you are using Azure SQL I recommend that you bump up the DTU’s significantly before encrypting, as it will run a lot faster due to the processor-intensive nature of the encryption. Also, ensure that you have turned off any services that are connected to the databases (xConnect collection service, etc).
NOTE: The documentation is incorrect. Differences are highlighted below.
To do this, right mouse click each table and select Encryption from the context menu:
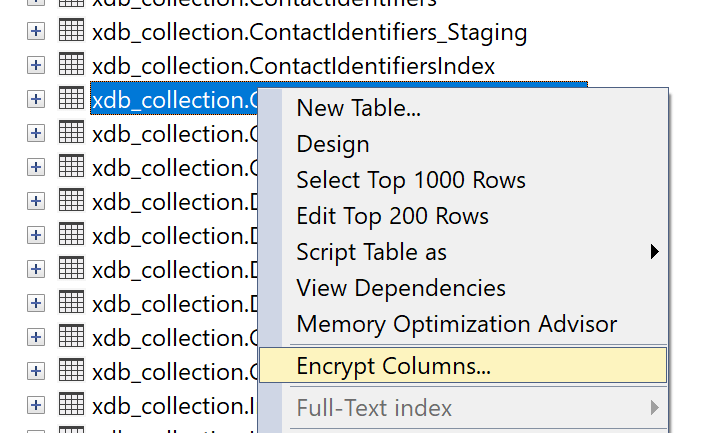
From the modal dialog box, set the encryption type for the columns:

Click OK and then, er, wait for a while……
Step 5 – Restore the stored procedures
This bit is pretty simple if you followed the list of tables above and encrypted the Identifier and Source columns in the UnlockContactIdentifiersIndex_Staging table. Just run the script for each shard (you did create a script for each shard right?) Otherwise, your stored procedure script will throw an error due to dependencies between tables. If you get the following error, then you’ve missed this table from your encryption:
Msg 402, Level 16, State 2, Procedure UnlockContactIdentifiersIndex, Line 26 [Batch Start Line xxxx]
The data types varbinary and varbinary(700) encrypted with [……] are incompatible in the equal to operator.
If there are any TMP tables left over after encryption then you can safely delete them (e.g. tmp_ms_xx_ContactFacets1 was one that I had left over after encryption).
Step 6 – Enable Change Tracking
You can use the script provided in step 3 above, for this, or do it manually.
Step 7 – Grant permissions to the collection user.
This step will depend on the name of the user that has access to the Collection Shard Map Manager database, since that is the user that accesses the Shards. Look in your connection strings config file for the xConnect Collection service and find the connection string named “collection” and identify the user in the connection string. In my case it was “xcsmmuser” (xConnect Shard Map Manager user). Yours may have a different user name. (Note that this user is not a Contained Database User, unlike most of the other Sitecore database users in the connection strings, because it needs to access more than one database.)
On both shards, run the following commands:
grant VIEW ANY COLUMN MASTER KEY DEFINITION to [your-xcsmmuser];
grant VIEW ANY COLUMN ENCRYPTION KEY DEFINITION to [your-xcsmmuser];
If you later on see the following error in your xConnect logs, then you’ve neglected to do the above step:
[Error] Sitecore.XConnect.Web.Infrastructure.Operations.GetEntitiesOperation`1[Sitecore.XConnect.Contact]: Sitecore.XConnect.Operations.DependencyFailedException: One or more dependencies failed —> Sitecore.Xdb.Collection.Failures.DataProviderException: Cannot access destination table ‘[xdb_collection].[GetContactIdsByIdentifiers_Staging]’. —> System.InvalidOperationException: Cannot access destination table ‘[xdb_collection].[GetContactIdsByIdentifiers_Staging]’. —> System.Data.SqlClient.SqlException: VIEW ANY COLUMN MASTER KEY DEFINITION permission denied in database ‘[shard database]’.
At which point, you are done with encryption but don’t forget to scale down your Azure SQL databases to their prior DTU settings to avoid incurring excess service charges. If you want to start querying encrypted data in SQL Management Studio then you will need to configure your database connection according to this super helpful post otherwise you will not be able to query or view the data. This post is also useful.
In the next article I will look at configuring client Id and Client Secret and configuring the xConnect services.
